
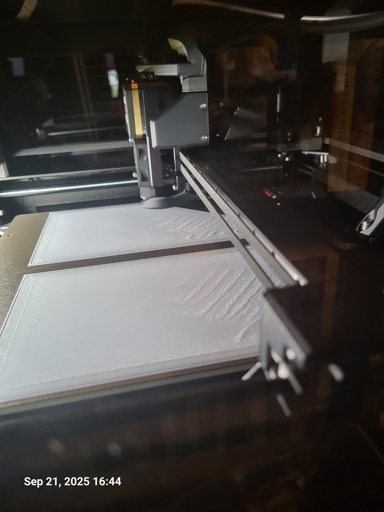
I’m now into my 3rd day with this printer, and while it’s been pretty smooth sailing with PETG so far, I have noticed some consistent layer gore on the first layer. It is consistent across prints with large flat surfaces, and always in the same spots.
However, what made me curious is the fact that it seemed to be at perfect 45 degree angle and at regular intervals, as if it’s some remnant of the first layer of another print.
These pectures were taken during the first print after cleaning the print sheet with warm water and dish soap. (I’m getting isopropyl alcohol next week).
Any tips and/or theories? The rest of the print comes out just fine, although I’m still tweaking the extrusion modifier.
.
.
.
PS: I’ll gather additional data over time based on the tips and theories posted in here. I’ll update the thread in a few days once I have some results (or lack thereof) to report.
UPDATE: For starters, slicer templates are at play. I didn’t notice that I had reverted to default when loading a project.
Beyond that, I’ve started playing with extrusion multiplier as per recommendations in here, and it’s getting better. I’m still trying to dial this in perfectly so that I get the other layers nice and full without nozzle accumulating any gunk. Once satisfied I’ll play around with settings for first layer.
I guess the updated theory is that the print head movements of the first layer happens to cause washboarding in those positions even if I rotate the print. I would suspect a large surface print would instead of two would result in a single washboard patch.
That is incredibly strange. The only thing I’m noting is that the error looks very similar and in the same spot on both models on the print bed… I’m assuming “consistent across prints with large flat surfaces” means that you’ve seen the issue on other models as well, to rule out a model error?
I agree that there appears to be the “remnants” of a previous print or something underneath though. Did you get the printer used?
Yeah, I’ve even tried the same model rotated 90 degrees, and the issue stays in the same spot relative to the print sheet.
It’s worth noting that once the infill starts, the “washboard” evens out, resulting in an overall fine print.
Then it’s a leveling issue. That corner is either too high or too low. Not sure why it’s not been suggested yet.
Soap and water is actually better than IPA. The bed levelling mesh is incorrect. Did you tram the bed at full bed temperature? Doing it on a room temp bed is not accurate.
Not OP, but I have a printer (Ender 3 v2 Neo) with a z-probe that when you tell it to autolevel, it sets the bed and nozzle target temperatures to 0°. (As in, turns both heating elements off.) That’s on the manufacturer’s stock firmware. Even if you preheat before autoleveling, by the time it’s done leveling, it’s much cooler. So autoleveling hot is sometimes not an option.
All that said, I’ve never had anything like the issues OP has on my Ender 3 v2 Neo. But maybe OP has a bigger bed and that might make a difference as to whether autoleveling on a cold bed could cause OP’s issue.
I have a printer (Ender 3 v2 Neo) with a z-probe that when you tell it to autolevel, it sets the bed and nozzle target temperatures to 0°. (As in, turns both heating elements off.)
Why I stopped buy Creality printers. And the features that never arrived. heating beds are coils under aluminum, so the plate will differentially expand when heated. Measuring the mesh cold is a waste ot time.
I sometimes get this if z-offset is slightly too low, try increasing distance to bed by something like 0.005mm or something
Edit: just re-read and saw it’s PETG you’re using, this makes me very confident in my above statement. PETG needs less first layer squish than for example PLA, you just need to increase Z-offset slightly and this should go away.
Two theories: first layer expansion and overextrusion.
If it’s first layer expansion, what’s happening is that your nozzle is too close to the bed when printing the first layer (so, less than 0.2mm if you’re printing at 0.2mm layer height) causing a line of filament to “spread out” more than it should. Over long lines of filament like those on your first layer, that effect can compound. Ultimately it’s trying to put more plastic down between those outer layers than can fit, causing it to “ripple”/wrinkle up. The fix would be adjust your z-probe-offset to make sure your nozzle has just a little bit more space above the bed on the first layer and then autolevel. Or on a machine with no z-probe (with just a z-endstop), to manually level the bed but leave a little more room between the nozzle and bed. If you go too far, you’ll end up with first layer adhesion problems. Like, the first layer will curl up on the corners or will pop entirely off the bed mid-print.
If overextrusion, what’s happening is roughly the same as I explained above. More filament than will fit is being laid down between those outer layers, causing it to wrinkle. The fix is to turn down your extrusion rate.
I don’t think I’ve ever had issues with overextrusion myself. But I’m pretty familiar with that first-layer-expansion issue. And to be honest, when I have that issue, the wrinkling I have always happens parallel to the lines of filament on that first layer, while the wrinkles in your picture seem to go perpendicular. I still think those are the first things I’d try, though. So YMMV, but hopefully what I said above helps.
Also, I’d be skeptical that flotsam or scunge from previous prints could be the problem here specifically. Especially after soap and water didn’t solve it.
Anyway, my 2¢. Good luck! Definitely worth reporting back if you find a solution!